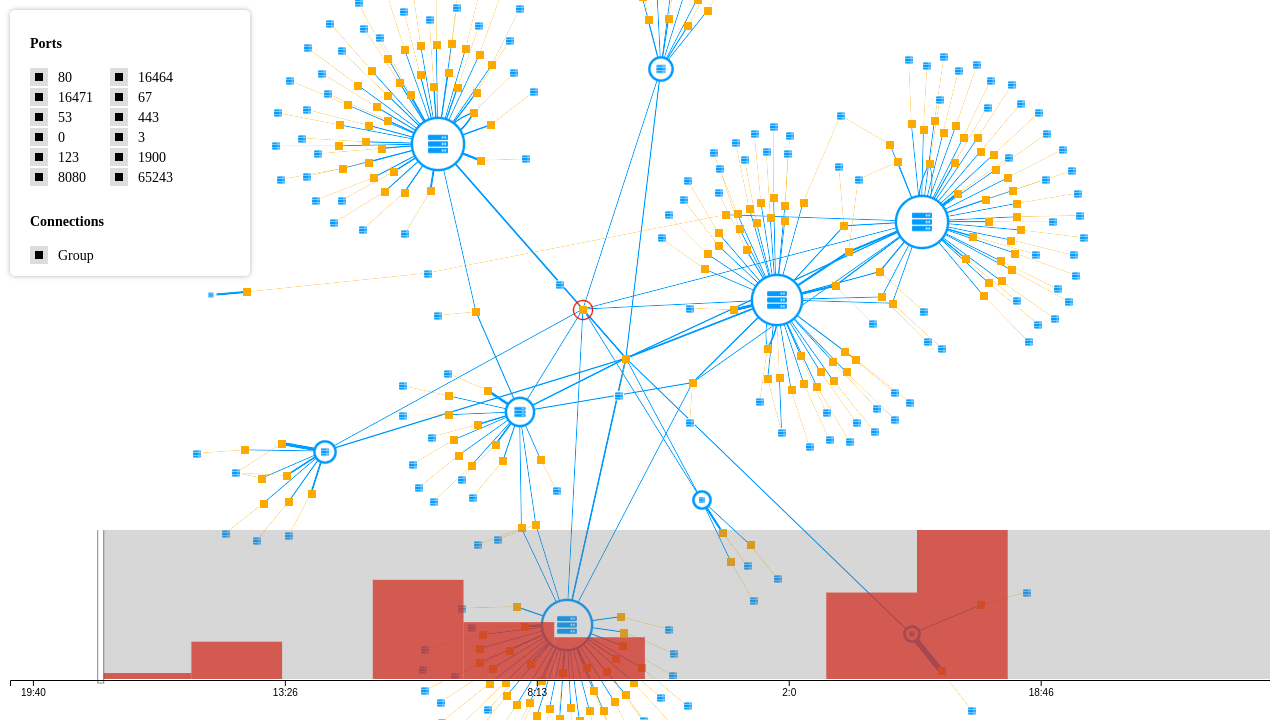
Getting Started

Ogma-Timeline-Plugin for Ogmaopen in new window.

demoopen in new window

Installation

First, you need to own a valid Ogma licence. Reach out Ogma salesopen in new window for more details. Let's say you start from scratch:

npm create vite@latest
cd my-ogma-app

Install Ogma and Ogma-timeline-plugin

npm i @linkurious/ogma @linkurious/ogma-timeline-plugin

Use Ogma-timeline-plugin in your App

import Ogma from "@linkurious/ogma";
import {Controller as TimelinePlugin } from "@linkurious/ogma-timeline-plugin";

const ogma = new Ogma({
  container: 'graph-container'
});
const timelineContainer = document.getElementById('timeline') as HTMLDivElement;
const timelinePlugin = new TimelinePlugin(ogma, container);

That's it ! You have a fully functionnal Ogma instance within your app, and a timeline showing your data.

Get the timestamps on your nodes and edges

By default the plugin looks for start and end keys within node data, and uses it to generate the timeline. If you store your data within the creation.date and deletion.date keys for instance, then you can pass nodeStartPath and nodeEndPath properties to the Controller constructor:

const timelinePlugin = new TimelinePlugin(ogma, container, {
  nodeStartPath: 'creation.date',
  nodeEndPath: 'deletion.date',
})

If some of your data does not have an end date, no worries, the plugin deals with undefined end dates. Though start date are mandatory.

Filter nodes and edges depending on time

The plugin provides a simple API to filter out nodes depending on user's input:

const timelinePlugin = new TimelinePlugin(ogma, container, {
  timeBars: [
    // place the bars at now and 01/01/70 to start
        new Date(Date.now()), 
        new Date(0),
      ],
  //configure filtering
  nodeFilter: {
    enabled: true,
    strategy: 'between',
    tolerance: 'loose'
  },
  edgeFilter: {
    enabled: true,
    strategy: 'between',
    tolerance: 'loose'
  },
})

//create filters
const nodeFilter = ogma.transformations.addNodeFilter({
    criteria: node => {
      return controller.filteredNodes.has(node.getId());
    },
  })
const edgeFilter = ogma.transformations.addEdgeFilter({
    criteria: edge => {
      return controller.filteredEdges.has(edge.getId());
    },
  })
//Hook it to the timeline events
controller.on('timechange', () => {
  nodeFilter.refresh();
  edgeFilter.refresh();
})

You can place as many bars as you want, but please place either one or a multiple of two bars. There are many filtering options availiable, please have a look at the filteringopen in new window section for more details.

Update the timeline on graph changes

When you create the timeline, it gets all the nodes within the vizualisation and saves their ids. Then the timeline will show only thoose nodes, but your graph might evolve with time, some nodes might be created/deleted. In that case, you need to hook on Ogma's events to refresh the timeline:

ogma.events.on(['addNodes', 'addEdges', 'removeNodes', 'removeEdges', 'clearGraph'] ,() => {
  timeline.refresh({nodes: ogma.getNodes(), edges: ogma.getEdges()})
})

Display only edges, or only nodes

If you just want to show nodes within your timeline, just call:

  timeline.refresh({nodes: ogma.getNodes()})

If you want to show just edges, call:

  timeline.refresh({edges: ogma.getEdges()})